Expose a Home Server Safely with Cloudflare Tunnel and Cockpit
Home labs usually die at the same hurdle: getting traffic in. The traditional answer — forward ports on the router, chase a dynamic IP, buy a certificate, hope nobody scans you — is a lot of moving parts held together by optimism. Cloudflare Tunnel replaces all of it with a single outbound connection. This is the setup I run, written so you can reproduce it on a clean Ubuntu box in under an hour.
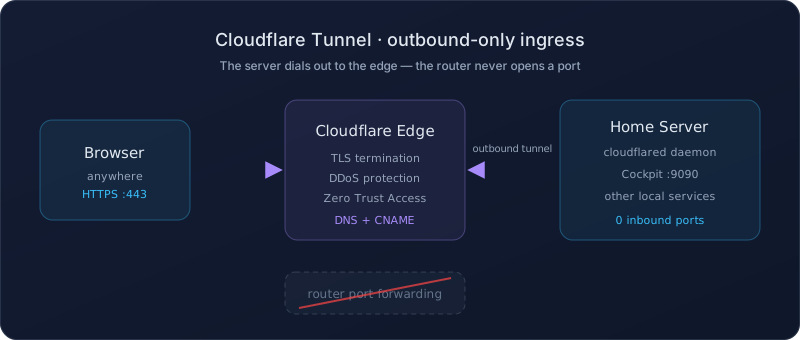
Why a tunnel instead of port forwarding
A tunnel inverts the direction of trust. The cloudflared daemon on your server opens
an outbound TLS connection to Cloudflare's edge and keeps it alive. Requests arrive at the edge,
get matched against your DNS records, and are handed back down that existing connection. Your
firewall stays fully closed to inbound traffic.
- No inbound ports. Nothing to scan, nothing to misconfigure on the router.
- No static IP, no DDNS. The tunnel re-registers itself when your IP changes.
- TLS and DDoS protection at the edge, included, with automatic renewal.
- Identity in front of everything. Cloudflare Access can require a verified email before a request ever reaches your box.
- Your origin IP is never published. DNS points at a tunnel CNAME, not at your house.
example.com with your own zone,
youruser with your Linux username, and <TUNNEL_UUID> with the UUID
Cloudflare issues in Step 3. Every credential in this article is a placeholder — no real
identifiers, hostnames, or tokens appear anywhere in it.
What you'll end up with
| Hostname | Routes to | Purpose |
|---|---|---|
ping.example.com | http_status:200 | Smoke test — proves the tunnel works before any real service exists |
admin.example.com | https://localhost:9090 | Cockpit web administration |
Keep the hostname list minimal and boring. Admin panels are the highest-value target on a home network, and a guessable name is free reconnaissance for anyone enumerating your zone.
Prerequisites
- Ubuntu 24.04 or newer with
sudoaccess - A domain added to Cloudflare, with its nameservers already delegated there
- Outbound HTTPS on port 443 (allowed by default on virtually every ISP)
Step 1 — Patch first
Start from a known-good baseline. If a kernel lands, reboot before continuing.
sudo apt update && sudo apt -y upgrade
sudo reboot   # only if a new kernel was installed
Step 2 — Install cloudflared from Cloudflare's signed repo
Use the apt repository rather than a downloaded binary, so you get security updates through your normal patch cycle.
curl -fsSL https://pkg.cloudflare.com/cloudflare-main.gpg \
  | sudo tee /usr/share/keyrings/cloudflare-main.gpg >/dev/null

echo "deb [signed-by=/usr/share/keyrings/cloudflare-main.gpg] \
https://pkg.cloudflare.com/cloudflared noble main" \
  | sudo tee /etc/apt/sources.list.d/cloudflared.list

sudo apt update && sudo apt install -y cloudflared
cloudflared --versionapt update will 404 against your actual codename —
pin noble as shown. The binary is standard glibc and runs fine on newer releases.
Switch back once your codename appears upstream.
Step 3 — Authenticate and create the tunnel
cloudflared tunnel login
A browser tab opens; pick your zone and authorize. This writes a certificate to
~/.cloudflared/cert.pem. On a headless box, the command prints a login URL — open it
on your laptop and the cert is fetched on the next retry.
cloudflared tunnel create home-serverCloudflare returns a UUID and writes a credentials JSON file next to your cert. Capture the UUID for the rest of the session:
export TUNNEL_UUID=$(basename "$(ls ~/.cloudflared/*.json | head -1)" .json)
echo "$TUNNEL_UUID"600, and if it leaks, run
cloudflared tunnel delete and create a fresh tunnel rather than trying to rotate
around it.
Step 4 — Describe your routes in config
mkdir -p ~/.cloudflared
nano ~/.cloudflared/config.yml
tunnel: <TUNNEL_UUID>
credentials-file: /home/youruser/.cloudflared/<TUNNEL_UUID>.json
ingress:
# Smoke test
- hostname: ping.example.com
service: http_status:200
# Cockpit admin panel
- hostname: admin.example.com
service: https://localhost:9090
originRequest:
noTLSVerify: true # Cockpit ships a self-signed cert for the server hostname
# Required catch-all — must be last
- service: http_status:404
Two details matter here. Rules are evaluated in order, so the catch-all has to
sit at the bottom or it will swallow everything above it. And noTLSVerify applies
only to the hop between cloudflared and a service on localhost — the
public leg of the connection is still fully verified TLS. Scope it per-route; never set it
globally.
Step 5 — Run it in the foreground first
Always validate interactively before you hand control to systemd.
cloudflared tunnel run home-server
You should see four Registered tunnel connection lines. Four is correct — Cloudflare
establishes redundant connections across edge locations so a single one dropping is invisible to
users.
Step 6 — Create the DNS records
In a second terminal, leaving the tunnel running in the first:
cloudflared tunnel route dns home-server ping.example.com
cloudflared tunnel route dns home-server admin.example.com
Each command creates a proxied CNAME pointing at
<TUNNEL_UUID>.cfargotunnel.com. Propagation is typically well under a minute.
Verify:
dig +short ping.example.com
dig +short admin.example.com
Now load https://ping.example.com — a bare HTTP 200 confirms the whole path works.
The admin hostname will return 502 or refuse the connection, which is expected: Cockpit isn't
installed yet. Getting a clean 200 from the placeholder before adding real services is what makes
the next failure easy to attribute.
Step 7 — Promote to a systemd service
Stop the foreground run with Ctrl+C, then move the config and credentials to the
system location so the daemon starts at boot without a user session.
sudo mkdir -p /etc/cloudflared
sudo cp ~/.cloudflared/config.yml /etc/cloudflared/config.yml
sudo cp ~/.cloudflared/"$TUNNEL_UUID".json /etc/cloudflared/
sudo chown -R root:root /etc/cloudflared
sudo chmod 600 /etc/cloudflared/"$TUNNEL_UUID".json

# Repoint credentials-file at the system copy
sudo sed -i "s|/home/youruser/.cloudflared/|/etc/cloudflared/|" \
  /etc/cloudflared/config.yml

sudo cloudflared service install
sudo systemctl enable --now cloudflared
systemctl status cloudflared
The chmod 600 is not optional. Under /etc the credentials file is
world-readable by default, which hands every local account a working tunnel credential.
Step 8 — Install Cockpit
sudo apt install -y cockpit
sudo apt install -y cockpit-podman     # container management
sudo apt install -y cockpit-machines   # KVM guests, if you run VMs

sudo systemctl enable --now cockpit.socket
ss -tlnp | grep 9090

sudo systemctl restart cloudflared     # re-resolve the now-live origin
Load https://admin.example.com and you'll get the Cockpit login. Authenticate as any
local Linux user; sudo members get full administrative access.
Step 9 — Tell Cockpit to trust the tunnel origin
Cockpit refuses WebSocket connections whose Origin header doesn't match its own
certificate hostname. Because Cloudflare terminates TLS at the edge and re-opens a fresh
connection to localhost:9090, the browser presents the public tunnel hostname as
the origin — which Cockpit rejects by default. The result is a login screen that renders but
hangs on "Connecting..." and never completes a session.
Whitelist the hostname you routed in Step 6:
sudo nano /etc/cockpit/cockpit.conf[WebService]
Origins = https://admin.example.comsudo systemctl restart cockpitStep 10 — Put identity in front of it
This is the step people skip, and it's the one that actually matters. As configured, your Cockpit login page — a root-equivalent entry point — is reachable by the entire internet, and the only thing between an attacker and your server is a password form. Cloudflare Access fixes that in about five minutes, free for small teams.
- Open the Cloudflare Zero Trust dashboard
- Access → Applications → Add an application → Self-hosted
- Set the application hostname to
admin.example.com - Add a policy: Allow → Emails → your own address (or an entire verified domain)
- Save, then reload the URL
You'll now hit a one-time-PIN challenge at the edge before Cockpit is reachable at all. Unauthenticated requests are rejected by Cloudflare and never touch your hardware — which means a leaked Cockpit password is no longer sufficient to get in, and credential-stuffing bots never reach the form.
Rule of thumb: if a hostname would let someone run commands on your machine, it gets an Access policy. Public read-only services can go without; admin surfaces cannot.
Step 11 — Verify end to end
systemctl status cloudflared
cloudflared tunnel info home-server

systemctl status cockpit
ss -tlnp | grep 9090

dig +short ping.example.com
dig +short admin.example.com
Both hostnames should resolve to your tunnel CNAME, and both services should report active.
Troubleshooting
| Symptom | Cause and fix |
|---|---|
apt update 404s on the cloudflared repo | Unsupported codename in the sources file — pin noble (Step 2) |
No browser opens during tunnel login | Headless box. Open the printed URL from your laptop. |
| Hostname doesn't resolve | Wait a minute, then dig +short <host>. Confirm the CNAME exists in the dashboard. |
| 502 Bad Gateway | Origin service is down. systemctl status cockpit. |
| Connection refused | Nothing listening on that port, or the service is bound to a different interface. |
| TLS errors in cloudflared logs | Self-signed origin without originRequest.noTLSVerify: true on that route. |
permission denied on credentials | sudo chmod 600 /etc/cloudflared/<TUNNEL_UUID>.json |
tunnel not found | UUID in config.yml doesn't match cloudflared tunnel list. |
| Cockpit: "Unable to log in" | Local account locked or password expired — reset it on the server. |
| Cockpit: "WebSocket disconnected" | Proxy buffering. Add a larger bufferSize under that route's originRequest. |
| Cockpit hangs on "Connecting..." after the login screen renders | Origin not whitelisted. Add the public hostname to Origins = in /etc/cockpit/cockpit.conf and restart Cockpit (Step 9). |
Useful commands
# Tunnel
cloudflared tunnel list
cloudflared tunnel info home-server
sudo journalctl -u cloudflared -f
sudo systemctl restart cloudflared

# Cockpit
systemctl status cockpit
sudo journalctl -u cockpit -f
sudo systemctl restart cockpit

# Confirm DNS from Cloudflare's own resolver
curl -s "https://cloudflare-dns.com/dns-query?name=ping.example.com&type=CNAME" \
  -H "accept: application/dns-json"
Adding another service
Three steps, every time. Insert the ingress block above the catch-all:
- hostname: service.example.com
  service: http://localhost:PORT      # https:// for a TLS origin
  originRequest:
    noTLSVerify: true                 # only for self-signed HTTPS origins
cloudflared tunnel route dns home-server service.example.com
sudo systemctl restart cloudflaredCommon origins: NAS web UIs on :5000, browser-based SSH on :8022, container managers on :9443.
Closing notes
What makes this setup hold up over time isn't the tunnel — it's the discipline around it: routes
declared in one reviewable config file, credentials at mode 600 and never in version
control, an Access policy on every administrative hostname, and a placeholder route you can curl
when something breaks. The tunnel removes the attack surface at your router. Those four habits
keep you from quietly rebuilding it somewhere else.