Carve a Dedicated /data Volume Out of Free LVM Space on Ubuntu
When you install Ubuntu Server on a modern machine, the installer hands you a 100 GB root LV and
quietly leaves the rest of your NVMe inside the volume group as unallocated space. This guide
walks through claiming that free space as a dedicated /data logical volume — ext4
formatted, fstab-mounted, and ready for services that shouldn't live on the root filesystem.
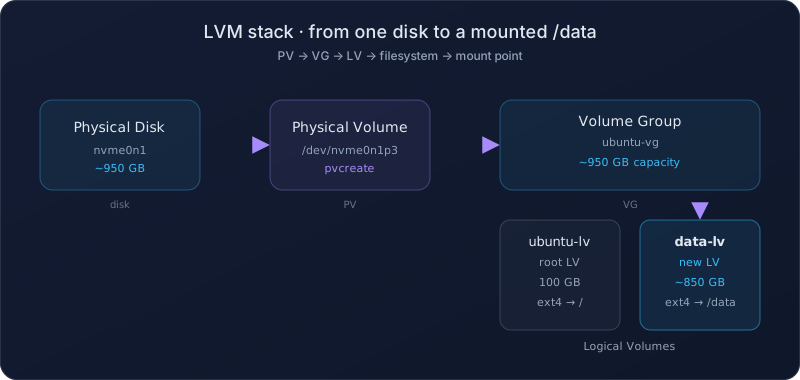
Why a dedicated /data volume
Most self-hosted services — Docker volumes, database data directories, media libraries, backup snapshots — shouldn't share a filesystem with the OS. Putting them on a separate volume gives you clean boundaries:
- Independent growth. Resize
/datawithout touching root, or vice versa. - Easier backups. Snapshot or back up the data LV without carrying the entire root filesystem.
- Cleaner reinstalls. Reinstall the OS on the root LV while
/datasurvives untouched. - Cleaner quotas and monitoring. Disk-pressure alerts point at the right layer.
And critically, on Ubuntu Server the LVM installer already leaves the room for it. You just have to carve it out.
What you'll end up with
| Component | Name | Size | Purpose |
|---|---|---|---|
| Physical Volume | /dev/nvme0n1p3 | ~950 GB | The partition Ubuntu allocated during install |
| Volume Group | ubuntu-vg | ~950 GB | Already exists; holds all logical volumes |
| Root LV | ubuntu-lv | 100 GB | Mounted at / — leave alone |
| Data LV | data-lv | ~850 GB (90% of free) | The new volume mounted at /data |
lvextend fails because the VG is exhausted. Adjust the percentage to taste.
Prerequisites
- Ubuntu Server installed with LVM partitioning (the default)
sudoaccess on the target machine- A confirmed backup or simply a throwaway machine — these commands only touch newly allocated space, but mistakes in
fstabcan prevent boot. Read each command before running it.
Step 1 — Confirm what's free
Before carving anything, see the lay of the land. You're looking for a Volume Group with more capacity than its existing logical volumes consume.
sudo vgsExpected output (sizes will differ):
  VG        #PV #LV #SN Attr   VSize    VFree
  ubuntu-vg   1   1   0 wz--n- <950.00g <850.00g
The #LV column currently shows 1 — just the root volume. The
VFree column shows what's available for new LVs. That gap is your working room.
Cross-check the existing logical volume:
sudo lvs LV VG Attr LSize
ubuntu-lv ubuntu-vg -wi-ao---- 100.00gStep 2 — Create the new logical volume
LVM resolves VG names with double-hyphens in device paths but single hyphens in the actual
vgcreate / lvcreate arguments. The path
/dev/mapper/ubuntu--vg-data--lv maps back to the VG named ubuntu-vg.
sudo lvcreate -l +90%FREE -n data-lv ubuntu-vg
-l +90%FREE allocates 90% of the volume group's remaining free space. If you'd
rather pick a specific size, swap it for -L 800G. The new LV now shows up in
sudo lvs alongside ubuntu-lv.
ls -l /dev/mapper/ubuntu--vg-data--lv or sudo lvs. Formatting the wrong
device destroys its contents instantly and irreversibly.
Step 3 — Format with ext4
ext4 is the boring, safe choice — a stable journaling filesystem with years of production use
and full fstab tooling. xfs is equally valid; pick what your distro supports best.
sudo mkfs.ext4 /dev/mapper/ubuntu--vg-data--lvThis takes seconds on an NVMe. The filesystem is created with a UUID; record it from the command output if you ever need to reference it directly:
sudo blkid /dev/mapper/ubuntu--vg-data--lvStep 4 — Mount it and verify
Create the mount point and attach the new filesystem to it:
sudo mkdir -p /data
sudo mount /dev/mapper/ubuntu--vg-data--lv /data
Confirm the mount is healthy and the size is what you expect:
df -h /dataFilesystem Size Used Avail Use% Mounted on
/dev/mapper/ubuntu--vg-data--lv 845G 77M 802G 1% /dataIf the size matches what you allocated and the used column is tiny, the volume is live.
Step 5 — Make it survive a reboot
mount by itself is per-session — the moment the box reboots, /data
disappears until you mount it again. To make it persistent, add an entry to
/etc/fstab:
echo "/dev/mapper/ubuntu--vg-data--lv  /data  ext4  defaults  0  2" \
  | sudo tee -a /etc/fstab
The trailing 0 2 means "don't dump" and "fsck after root." For a data volume on
ext4, that order is correct. Databases and similar write-heavy filesystems usually want
0 0 instead — skip the periodic fsck and rely on the application for consistency.
Step 6 — Validate fstab before rebooting
A malformed fstab entry can prevent the system from booting cleanly. Validate it
without rebooting:
sudo mount -a
If the command returns with no output and /data stays mounted, the entry is sound.
If it complains, fix the line in /etc/fstab and re-run before you ever reboot.
ubuntu--vg-data--lv path can shift. For absolute robustness, replace it in
fstab with UUID=<the-uuid-from-blkid>.
Troubleshooting
| Symptom | Cause and fix |
|---|---|
sudo vgs shows 0 free | Root LV already consumed the VG. You'll need to shrink or migrate it first — don't shrink root without a rescue plan. |
lvcreate says volume group not found | VG name mismatch — confirm with sudo vgs. The map path uses ubuntu--vg but the command argument is ubuntu-vg. |
mkfs.ext4 refuses to write | Wrong device path, or device already mounted. mount | grep <device> and lsblk to confirm. |
df -h /data shows wrong size | The mount picked up a different device. Verify with findmnt /data. |
mount -a errors after editing fstab | Syntax error in the new line. Revert it with sudoedit /etc/fstab before rebooting. |
| System refuses to boot after fstab change | Drop to the initramfs shell, mount the root filesystem read-write, and edit /etc/fstab to remove or correct the offending entry. |
Useful commands
# Inspect the LVM stack
sudo pvs        # physical volumes
sudo vgs        # volume groups (capacity and free space)
sudo lvs        # logical volumes (sizes and attributes)

# Mount state
findmnt /data
mount | grep /data

# Filesystem identity
sudo blkid /dev/mapper/ubuntu--vg-data--lv

# Grow the LV later when you need more space
sudo lvextend -l +100%FREE /dev/mapper/ubuntu--vg-data--lv
sudo resize2fs /dev/mapper/ubuntu--vg-data--lv
Resize when /data fills up
LVM's main selling point is that the volume doesn't have to stay the size you first carved.
When /data fills, free space in the VG, and:
sudo lvextend -l +100%FREE /dev/mapper/ubuntu--vg-data--lv
sudo resize2fs /dev/mapper/ubuntu--vg-data--lv
df -h /data
The filesystem grows online while mounted — no downtime. Shrinking ext4 is possible but more delicate; do it offline and with a backup.
Closing notes
What makes this five-minute job feel delicate isn't the carving — it's the fstab step. A
misplaced space in that file can prevent a box from booting, and that's the part worth doing
carefully: sudo mount -a to validate, then a planned reboot to confirm. The rest
is mechanical, and the payoff is a clean separation between OS and data that pays for itself
the first time you reinstall or migrate a service.