PostgreSQL Public Gateway with VPS + WireGuard
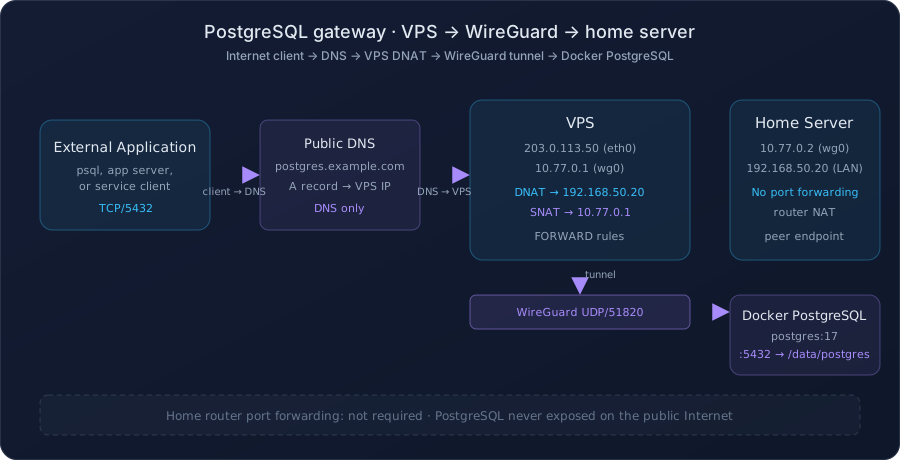
The home server runs PostgreSQL. The home router exposes nothing. A WireGuard link to a small VPS carries inbound PostgreSQL traffic through the tunnel, and the VPS performs DNAT + SNAT so external clients connect to a public hostname and end up talking to a database that never touches the open internet directly. This is the full setup — keys, tunnel, NAT rules, persistence, DNS, and end-to-end verification — written so you can reproduce it on a clean pair of Ubuntu machines.
Why this shape
Publishing a database directly — port forward 5432 on the home router, hand out the IP — trades your home network for the lowest possible setup cost. Every scanner on the internet finds the open port within minutes, and a single weak password becomes a full host takeover. The right move is to keep the database on the LAN and put a thin public surface in front of it.
A small VPS handles that surface. It holds a public IP, a DNS name, and a WireGuard peer that terminates a tunnel into your home network. The home server initiates the tunnel outbound — no inbound rules on the home router at all — and the VPS performs DNAT on incoming TCP/5432 plus SNAT on the return path so PostgreSQL sees a stable source address and replies follow the tunnel back. The home server's LAN IP, the database port, and every database password stay off the public internet.
- No inbound ports at home. The home router keeps its default-deny posture for everything.
- Encrypted link. WireGuard carries the database traffic over UDP/51820 with modern cryptography.
- Cheap and replaceable. If the VPS is compromised, you revoke its peer key and bring up a new one — the database itself was never exposed.
- Predictable source address. SNAT on the VPS makes every forwarded connection appear to PostgreSQL as the WireGuard peer IP, which
pg_hba.confcan lock down to one line.
203.0.113.50, 192.168.50.20, postgres.example.com,
and every key/password slot are examples. Substitute your own values and never publish real
keys, real public IPs, or real domain names in this kind of write-up.
What you'll end up with
| Component | Example value |
|---|---|
| VPS public IP | 203.0.113.50 |
| VPS public interface | eth0 |
| VPS WireGuard IP | 10.77.0.1/24 |
| Home server LAN IP | 192.168.50.20 |
| Home server WireGuard IP | 10.77.0.2/24 |
| WireGuard port | 51820/udp |
| PostgreSQL port | 5432/tcp |
| Public hostname | postgres.example.com |
| PostgreSQL container | postgres (postgres:17) |
| PostgreSQL data | /data/postgres |
Prerequisites
- One VPS with a public IP and Ubuntu 24.04 or newer,
sudoaccess, and ports 5432/tcp + 51820/udp open on the cloud firewall - One home server on a LAN running Ubuntu 24.04 or newer, with Docker and
sudo - A domain you control with a DNS provider that supports an
Arecord pointed at the VPS - Outbound UDP/51820 from the home server (allowed by default on virtually every ISP)
Step 1 — Run PostgreSQL on the home server
PostgreSQL stays on the LAN. A Docker container with data on a host bind mount gives you clean separation between the OS and database files — same shape as the /data volume guide.
sudo mkdir -p /data/postgres
sudo docker run -d \
  --name postgres \
  --restart unless-stopped \
  -e POSTGRES_PASSWORD=USE-A-STRONG-UNIQUE-PASSWORD \
  -v /data/postgres:/var/lib/postgresql/data \
  -p 0.0.0.0:5432:5432 \
  postgres:17
Confirm the container is up and the volume is mounted where you expect:
sudo docker ps
sudo docker inspect postgres --format '{{range .Mounts}}{{println .Source " -> " .Destination}}{{end}}'
Expected:
/data/postgres -> /var/lib/postgresql/dataConfirm the listener is bound to all interfaces:
sudo ss -lntp | grep 5432Expected:
0.0.0.0:5432
[::]:5432
And confirm the database actually answers:
sudo docker exec postgres psql -U postgres -c "SELECT version();"-p 0.0.0.0:5432:5432 line is intentional.
The host binds the listener on every interface so the WireGuard peer (the VPS at
10.77.0.1) can reach 192.168.50.20:5432 across the tunnel. The
listener is still not exposed to the public internet — the home router doesn't forward
5432, so the only path in is the tunnel itself.
Step 2 — Install WireGuard on both machines
On each host:
sudo apt update
sudo apt install -y wireguard
WireGuard ships with the wg and wg-quick tools. The tunnel uses
10.77.0.0/24 internally and listens on UDP/51820 on the VPS.
Step 3 — Generate keys
WireGuard uses Curve25519 keypairs. The umask 077 wrapper keeps the private
key file readable only by root, which is what wg-quick requires.
On the VPS:
sudo sh -c 'umask 077; wg genkey > /etc/wireguard/server_private.key'
sudo sh -c 'wg pubkey < /etc/wireguard/server_private.key > /etc/wireguard/server_public.key'
sudo cat /etc/wireguard/server_public.key
On the home server:
sudo sh -c 'umask 077; wg genkey > /etc/wireguard/home_private.key'
sudo sh -c 'wg pubkey < /etc/wireguard/home_private.key > /etc/wireguard/home_public.key'
sudo cat /etc/wireguard/home_public.key
Copy each public key to the other machine. Never copy a private key across the boundary; each side keeps its own and the peers exchange only public keys.
Step 4 — Configure WireGuard on the VPS
The VPS is the "server" in the WireGuard sense: it holds a static endpoint and waits for
the home peer to dial in. The AllowedIPs entry below contains both the peer's
tunnel address and the peer's LAN address — the LAN address is what the DNAT rule
forwards to.
sudo nano /etc/wireguard/wg0.conf[Interface]
Address = 10.77.0.1/24
ListenPort = 51820
PrivateKey = VPS_PRIVATE_KEY
[Peer]
PublicKey = HOME_PUBLIC_KEY
AllowedIPs = 10.77.0.2/32, 192.168.50.20/32
PersistentKeepalive = 25sudo chmod 600 /etc/wireguard/wg0.confStep 5 — Configure WireGuard on the home server
The home side is the "client": it dials the VPS's public endpoint and routes the tunnel
subnet through the interface. Endpoint must be the VPS's actual public IP and
the 51820 WireGuard port.
sudo nano /etc/wireguard/wg0.conf[Interface]
Address = 10.77.0.2/24
PrivateKey = HOME_PRIVATE_KEY
[Peer]
PublicKey = VPS_PUBLIC_KEY
Endpoint = 203.0.113.50:51820
AllowedIPs = 10.77.0.0/24
PersistentKeepalive = 25sudo chmod 600 /etc/wireguard/wg0.confAllowedIPs means "encrypt traffic for these destinations," not "allow
inbound." Both directions are coded in the same field. On the VPS,
AllowedIPs = 10.77.0.2/32, 192.168.50.20/32 says the peer may send traffic
destined for either the tunnel IP or the LAN IP — the LAN IP is what DNAT will
rewrite packets to.
Step 6 — Bring the tunnel up
On each host:
sudo systemctl enable --now wg-quick@wg0
sudo wg
A healthy tunnel shows a recent latest handshake and a non-zero
transfer counter on both sides:
peer: HOME_PUBLIC_KEY
  endpoint: <home-public-ip>:51820
  latest handshake: 12 seconds ago
  transfer: 1.23 KiB received, 2.04 KiB sent
If latest handshake is missing on either side, work through the keys, the
endpoint IP, and the UDP/51820 firewall on the VPS cloud panel before continuing — nothing
downstream works without the tunnel.
Step 7 — Test the tunnel
From the VPS:
sudo ping -c 4 10.77.0.2If the home server's WireGuard address replies, the tunnel is up. Confirm the database is reachable through the tunnel using its LAN address — that's the address the DNAT rule will rewrite to:
sudo nc -vz 192.168.50.20 5432Expected:
Connection to 192.168.50.20 5432 port [tcp/postgresql] succeeded!Step 8 — Enable IPv4 forwarding on the VPS
Forwarding has to be on for the VPS to act as a router between eth0 and
wg0.
sudo sysctl -w net.ipv4.ip_forward=1
sudo sh -c 'echo "net.ipv4.ip_forward=1" > /etc/sysctl.d/99-ip-forward.conf'
sudo sysctl --system
sudo sysctl net.ipv4.ip_forward
Expected:
net.ipv4.ip_forward = 1Step 9 — Identify the VPS public interface
Don't assume eth0. Different cloud providers name their interfaces differently,
and the DNAT rule below has to bind to whichever one is the public side.
sudo ip route get 8.8.8.8Example output:
8.8.8.8 via 203.0.113.1 dev eth0 src 203.0.113.50
The dev name is your public interface and the src is your public
IP. Use the values from this command in every iptables line that follows.
Step 10 — DNAT: rewrite the public destination
DNAT in PREROUTING rewrites the destination of incoming packets
aimed at the VPS so they target the home server's LAN address instead.
sudo iptables -t nat -A PREROUTING \
  -i eth0 \
  -p tcp \
  --dport 5432 \
  -j DNAT \
  --to-destination 192.168.50.20:5432
A packet that arrived at 203.0.113.50:5432 now leaves PREROUTING rewritten to
192.168.50.20:5432, ready to be forwarded into the tunnel.
Step 11 — Allow forwarding through the VPS firewall
FORWARD rules let packets cross between eth0 and wg0.
The conntrack match on NEW,ESTABLISHED,RELATED on the ingress
path and ESTABLISHED,RELATED on the return path is what lets stateful
forwarding work without listing every reply packet.
sudo iptables -A FORWARD \
  -i eth0 -o wg0 \
  -p tcp -d 192.168.50.20 --dport 5432 \
  -m conntrack --ctstate NEW,ESTABLISHED,RELATED \
  -j ACCEPT

sudo iptables -A FORWARD \
  -i wg0 -o eth0 \
  -p tcp -s 192.168.50.20 --sport 5432 \
  -m conntrack --ctstate ESTABLISHED,RELATED \
  -j ACCEPT
Step 12 — SNAT: pin the source to the tunnel
Without SNAT, the home server's reply to an external client would try to leave through the
home router's default route — straight to the internet client — and the connection would
never come back through the tunnel. SNAT rewrites the source of forwarded packets so they
appear to come from the VPS's tunnel IP 10.77.0.1. PostgreSQL then sees the
connection originating from a single, predictable address.
sudo iptables -t nat -A POSTROUTING \
  -o wg0 \
  -p tcp -d 192.168.50.20 --dport 5432 \
  -j SNAT --to-source 10.77.0.1
Step 13 — Open the VPS firewall
Two holes on the cloud panel and UFW:
sudo ufw allow 5432/tcp
sudo ufw allow 51820/udp
sudo ufw status
That is the complete set. Anything else on the VPS should be denied by default — the smaller the surface, the smaller the blast radius if the box is compromised.
Step 14 — Make iptables rules survive a reboot
iptables rules live in memory; they vanish on reboot unless you persist them.
The cleanest way on Debian/Ubuntu is iptables-persistent.
sudo apt install -y iptables-persistent
sudo netfilter-persistent save
During install, accept the prompt to save the current IPv4 rules (the iptables
rules you just wrote are still in the live set, so this writes them straight to
/etc/iptables/rules.v4). The explicit save after the install picks
up anything you added since.
Verify:
sudo netfilter-persistent status
sudo cat /etc/iptables/rules.v4
The DNAT, FORWARD, and SNAT rules should all be present in the saved file. If a rule is missing from the live set after a reboot, it's missing from this file.
Step 15 — Add the public DNS record
In your DNS provider's panel, create:
| Field | Value |
|---|---|
| Type | A |
| Name | postgres.example.com |
| Target | 203.0.113.50 |
| Proxy | DNS only |
For ordinary PostgreSQL TCP/5432 forwarding, "DNS only" is correct. A reverse-proxy/CDN mode would mangle the protocol.
Step 16 — Test the public gateway
From an external computer:
nc -vz 203.0.113.50 5432Expected:
Connection to 203.0.113.50 port 5432 [tcp/postgresql] succeeded!And through the DNS record:
nc -vz postgres.example.com 5432
nslookup postgres.example.com
If both succeed, the path Internet → VPS:5432 → DNAT → WireGuard → Home Server → Docker PostgreSQL is end-to-end functional.
Step 17 — Lock down PostgreSQL itself
WireGuard makes the path private; it does not make the database safe. Apply the same
hygiene you would to any internet-facing database — distinct users, distinct databases, and
a tightly scoped pg_hba.conf.
Per-application users and databases
Every application gets its own database, its own role, and only the privileges it needs.
The default postgres superuser stays for administration and is not handed to
any application.
sudo docker exec -i postgres psql -U postgres <<'SQL'
CREATE DATABASE n8n;
CREATE USER n8n_user WITH PASSWORD 'USE-A-STRONG-UNIQUE-PASSWORD';
GRANT ALL PRIVILEGES ON DATABASE n8n TO n8n_user;

CREATE DATABASE application_a;
CREATE USER application_a_user WITH PASSWORD 'USE-A-STRONG-UNIQUE-PASSWORD';
GRANT ALL PRIVILEGES ON DATABASE application_a TO application_a_user;
SQL
Restrict pg_hba.conf to the tunnel peer
Because the VPS SNAT rule makes every forwarded connection appear to come from
10.77.0.1, you can lock remote access to a single line. Find the file:
sudo docker exec postgres psql -U postgres -c "SHOW hba_file;"
For a Docker container that file is typically inside the data directory. Add the line below
to pg_hba.conf (preserving any rules that are already there):
host all all 10.77.0.1/32 scram-sha-256
The connection arrives as 10.77.0.1 and is matched against this rule. Nothing
else passes.
Verify authentication is scram-sha-256
sudo docker exec postgres psql -U postgres -c "SHOW password_encryption;"
For modern PostgreSQL deployments, scram-sha-256 is the right choice. If you're
on a fresh postgres:17 container, it is already the default.
Step 18 — Connect from the client
Any PostgreSQL client now works against the public hostname:
psql -h postgres.example.com -p 5432 -U application_a_user -d application_a
Don't paste database passwords into shell history. Use ~/.pgpass with
chmod 600, or a secrets manager on the calling machine.
End-to-end verification checklist
Walk this list top to bottom whenever something looks off.
# WireGuard
sudo wg                                          # latest handshake present, transfer > 0

# IP forwarding on the VPS
sudo sysctl net.ipv4.ip_forward                 # = 1

# Tunnel reachable from the VPS
sudo ping -c 4 10.77.0.2
sudo nc -vz 192.168.50.20 5432

# Public reachability from outside
nc -vz 203.0.113.50 5432
nc -vz postgres.example.com 5432

# DNAT and FORWARD counters
sudo iptables -t nat -L PREROUTING -n -v         # packets flowing in
sudo iptables -L FORWARD -n -v                  # packets being forwarded

# Persistent rules
sudo cat /etc/iptables/rules.v4

# PostgreSQL itself
sudo docker exec postgres psql -U postgres -c "SELECT version();"
sudo ss -lntp | grep 5432
sudo docker ps --filter name=postgres
Reboot verification
After the persistence step, reboot the VPS during a maintenance window and confirm everything came back up:
sudo rebootAfter reconnecting:
sudo wg
sudo sysctl net.ipv4.ip_forward
sudo iptables -t nat -L PREROUTING -n -v
sudo iptables -L FORWARD -n -v
nc -vz postgres.example.com 5432
If all four checks succeed, the gateway survived the reboot and will keep working through every future one.
Troubleshooting
| Symptom | Where to look |
|---|---|
| No WireGuard handshake | Keys, endpoint IP, UDP/51820 on the VPS cloud firewall. sudo wg on both sides — check latest handshake and endpoint. |
| Handshake works but database unreachable through VPS | iptables -t nat -L PREROUTING -n -v for the DNAT counter, then iptables -L FORWARD -n -v for the FORWARD counter. Packet counters tell you which rule traffic is stopping at. |
| DNAT counter stays at zero on public tests | The connection isn't reaching the VPS. Check ss -lntp | grep 5432, the cloud firewall, and nslookup postgres.example.com. |
| DNAT counter increments but connection fails | Forwarding or the tunnel itself is broken. iptables -L FORWARD -n -v, sudo wg, then nc -vz 192.168.50.20 5432 from the VPS to confirm the home leg. |
| PostgreSQL rejects authentication despite network working | The path is fine. Check the username, password, database, pg_hba.conf rule, and the password encryption method. The gateway and the database auth are separate layers. |
| Rules vanish after reboot | Persistence isn't installed or the rules weren't saved. sudo apt install -y iptables-persistent followed by sudo netfilter-persistent save and a check of /etc/iptables/rules.v4. |
Closing notes
Three boundaries hold this design together. PostgreSQL stays on the LAN. The home router stays closed. The VPS holds one job — terminate the tunnel and forward one port. If any of those three collapses, the design falls over; if all three hold, the database behind the gateway is in roughly the same posture as a database in a private VPC.
The mechanical work is mostly in Step 10–14 — five iptables lines and a
package install. The discipline is in keeping what those lines forward narrow: one port,
one destination, one peer. The moment you start adding multiport or
forwarding entire subnets "for convenience," you've turned the gateway back into the same
exposure you started by trying to avoid.
Keep private: WireGuard private keys, PostgreSQL passwords, real LAN addresses, real public IPs, real domain names. What's safe to publish as architecture: the public hostname, the PostgreSQL port, the WireGuard UDP port, and the DNAT/FORWARD/SNAT pattern.
← All blogs